How to Deploy a DNS Server on CentOS 7

In this step-by-step tutorial I’ll try to make it as faster as I can in the way you will not waste your entire life reading to make something working.

I’ll not explain every detail and what is a DNS Server (but I promisse I can make a post regarding this topic for those who don’t know).

This Post is to make you do what you need to do without bla bla bla.

The initial setup in my case is:

Hostname: ns.zlab.com

IPADDR=192.168.193.2
NETMASK=255.255.255.0
GATEWAY=192.168.193.1
DNS1=8.8.8.8
DNS2=8.8.4.4

First of all, make a clean centOS 7 installation and update it with:

yum update -y

Reboot

shutdown -rf now

Done this, you will need to install the bind packages and configure some files.

yum install bind bind-utils -y

Than, you will need to create the zones directory (where you’ll place the files regarding your DNS zones ;-)).

mkdir /etc/named/zones

On /etc/named.conf you will need it to be like this (pay attention on piece of text in bold – that’s what you’ll need to adapt in order to fit your needs).

vi /etc/named.conf

Copy the code above, adapt to your needs, paste and save.

Note that what was modified:

The server IP Address: 192.168.192.2
The allow-query session to: any
Add the code block with Google’s DNS Forward Information (You can use your Preferred DNS).

        forwarders {
                8.8.8.8;
                8.8.4.4;
        };

Add the line that will include the file with the zone information itself.

include "/etc/named/named.conf.local";

The final version should looks like this:

//
// named.conf
//
// Provided by Red Hat bind package to configure the ISC BIND named(8) DNS
// server as a caching only nameserver (as a localhost DNS resolver only).
//
// See /usr/share/doc/bind*/sample/ for example named configuration files.
//
// See the BIND Administrator's Reference Manual (ARM) for details about the
// configuration located in /usr/share/doc/bind-{version}/Bv9ARM.html

options {
        listen-on port 53 { 127.0.0.1; 192.168.193.2; };
        listen-on-v6 port 53 { ::1; };
        directory       "/var/named";
        dump-file       "/var/named/data/cache_dump.db";
        statistics-file "/var/named/data/named_stats.txt";
        memstatistics-file "/var/named/data/named_mem_stats.txt";
        recursing-file  "/var/named/data/named.recursing";
        secroots-file   "/var/named/data/named.secroots";
        allow-query     { any; };

        /*
         - If you are building an AUTHORITATIVE DNS server, do NOT enable recursion.
         - If you are building a RECURSIVE (caching) DNS server, you need to enable
           recursion.
         - If your recursive DNS server has a public IP address, you MUST enable access
           control to limit queries to your legitimate users. Failing to do so will
           cause your server to become part of large scale DNS amplification
           attacks. Implementing BCP38 within your network would greatly
           reduce such attack surface
        */
        recursion yes;

        forwarders {
                8.8.8.8;
                8.8.4.4;
        };


        dnssec-enable yes;
        dnssec-validation yes;

        /* Path to ISC DLV key */
        bindkeys-file "/etc/named.root.key";

        managed-keys-directory "/var/named/dynamic";

        pid-file "/run/named/named.pid";
        session-keyfile "/run/named/session.key";
};

logging {
        channel default_debug {
                file "data/named.run";
                severity dynamic;
        };
};

zone "." IN {
        type hint;
        file "named.ca";
};

include "/etc/named.rfc1912.zones";
include "/etc/named.root.key";
include "/etc/named/named.conf.local";

After that, let’s create the /etc/named/named.conf.local file.

vi /etc/named/named.conf.local

This must the the content (please adapt it to your needs, the lines you need to adjust are in bold).

zone "zlab.com" {
    type master;
    file "/etc/named/zones/zlab.com";
};

zone "193.168.192.in-addr.arpa" {
    type master;
    file "/etc/named/zones/db.192.168.193";  # 192.168.193.0/24 subnet
};

Than, create the zone files, in my case is zlab.com and db.192.168.193.

vi /etc/named/zones/zlab.com

The content should be like this (change according to your needs) :

;
; BIND data file for local loopback interface
;
$TTL    604800
@       IN      SOA     zlab.com. admin.zlab.com. (
                              1         ; Serial
                         604800         ; Refresh
                          86400         ; Retry
                        2419200         ; Expire
                         604800 )       ; Negative Cache TTL
;
@       IN      NS      ns.zlab.com.
ns.zlab.com.              IN      A       192.168.193.2

Note that this line

ns.zlab.com.              IN      A       192.168.193.2

is the record about your DNS server itself. I’ll need to add the rest of your infrastructure using the same schema, example:

ns.zlab.com.              IN      A       192.168.193.2
ldap.zlab.com.            IN      A       192.168.193.10
w10.zlab.com.             IN      A       192.168.193.20

Save the file and edit the reverse zone file, in my case db.192.168.193 file.

vi /etc/named/zones/db.192.168.193

The content should be like this (change according to your needs) :

;
; BIND reverse data file for local loopback interface
;
$TTL    604800
@       IN      SOA     zlab.com. admin.zlab.com. (
                              2         ; Serial
                         604800         ; Refresh
                          86400         ; Retry
                        2419200         ; Expire
                         604800 )       ; Negative Cache TTL
;
@       IN      NS      ns.

; also list other computers
10      IN      PTR     ns.zlab.com.           ; 192.168.193.2

Note that this line

10      IN      PTR     ns.zlab.com.           ; 192.168.193.2

is the record about your DNS server itself. I’ll need to add the rest of your infrastructure using the same schema, example:

10      IN      PTR     ns.zlab.com.           ; 192.168.193.2
10      IN      PTR     ldap.zlab.com.         ; 192.168.193.10
10      IN      PTR     w10.zlab.com.          ; 192.168.193.20

Save the file.

Change the server DNS to 127.0.0.1 so your network config should look like this:

IPADDR=192.168.193.2
NETMASK=255.255.255.0
GATEWAY=192.168.193.1
DNS1=127.0.0.1

Restart the bind daemon.

systemctl restart named

Make it enabled in the system (to be enabled after reboot)

systemctl enable named

Set firewall rules:

firewall-cmd --permanent --new-service=named
firewall-cmd --permanent --zone=public --add-port=53/tcp
firewall-cmd --permanent --zone=public --add-port=53/udp
firewall-cmd --reload

Now is the best part, make it work on your infrastructure!

It’s really simple now!

Where you in normal situation would setup Google or your Internet Provider DNS, you set the DNS Server IP Address.

Example for linux centOS machines:

IPADDR=192.168.193.X
NETMASK=255.255.255.0
GATEWAY=192.168.193.1
DNS1=192.168.193.2

You’ll need to adapt it according to your client Operational System.

Hope it helps you.

How to Deploy a Kubernetes Cluster with 3 Worker Nodes on CentOS 7.7 including DashBoard and External Access

Hello Guys,

For this Lab Environment we’ll need 4 Virtual Machines:

1 CentOS VM with 8GB Ram and 15GB Disk with IP 192.168.132.100 for the k8s-master;
1 CentOS VM with 4GB Ram and 15GB Disk with IP 192.168.132.101 for the k8s-worker1;
1 CentOS VM with 4GB Ram and 15GB Disk with IP 192.168.132.102 for the k8s-worker2;
1 CentOS VM with 4GB Ram and 15GB Disk with IP 192.168.132.103 for the k8s-worker3;

The OS installation complete, let’s start installing things on it.

First of all, let’s adjust the IP addresses and Hostnames according to the specs above. Also, it’s really good to update the /etc/hosts in every node including those lines:

192.168.132.100 k8s-master
192.168.132.101 k8s-worker1
192.168.132.102 k8s-worker2
192.168.132.103 k8s-worker3

To adjust Hostname, run the command bellow replacing with hostname with the respective Virtual Machine:

For the Master

# hostnamectl set-hostname 'k8s-master'

For the Worker1

# hostnamectl set-hostname 'k8s-worker1'

For the Worker2

# hostnamectl set-hostname 'k8s-worker2'

For the Worker3

# hostnamectl set-hostname 'k8s-worker3'

Great, IN ALL NODES, we need to run the following steps:

Update the system

# yum update -y

Install the yum-config-manager and add the repo to install docker

# yum install -y yum-utils device-mapper-persistent-data lvm2
# yum-config-manager --add-repo https://download.docker.com/linux/centos/docker-ce.repo

Configure iptables for Kubernetes

# cat <  /etc/sysctl.d/k8s.conf
net.bridge.bridge-nf-call-ip6tables = 1
net.bridge.bridge-nf-call-iptables = 1
EOF
# sysctl --system

Add the kubernetes repo needed to find the kubelet, kubeadm and kubectl packages

# cat < /etc/yum.repos.d/kubernetes.repo
[kubernetes]
name=Kubernetes
baseurl=https://packages.cloud.google.com/yum/repos/kubernetes-el7-x86_64
enabled=1
gpgcheck=1
repo_gpgcheck=1
gpgkey=https://packages.cloud.google.com/yum/doc/yum-key.gpg https://packages.cloud.google.com/yum/doc/rpm-package-key.gpg
exclude=kube*
EOF

Set SELinux to Permissive Mode

# setenforce 0
# sed -i 's/^SELINUX=enforcing$/SELINUX=permissive/' /etc/selinux/config

Turn off the swap

# swapoff -a
# sed -i '/swap/d' /etc/fstab

Install Kubernetes and Docker

# yum install -y kubelet kubeadm kubectl --disableexcludes=kubernetes docker-ce docker-ce-cli containerd.io

Start and Enable Docker

# systemctl enable --now docker

Start and Enable Kubernetes

# systemctl enable --now kubelet

Let’s disable the Firewall so we could put things working first, than, correct security (in future post)

# systemctl disable firewalld --now

———————————————————————————————————————————-

Ok, Done those steps in Every Virtual Machine we’ll jump to the k8s-master and run the following steps:

# yum -y install wget lsof
# modprobe br_netfilter
# echo '1' > /proc/sys/net/bridge/bridge-nf-call-iptables

Restart

# shutdown -rf now

Start the Cluster

# kubeadm init

After started, copy the kubeadm join line for the use in the future on Worker Nodes (pay attention that you need to copy your output line because every build generates its own token. This example above was the kubeadm join line my installation generates and will not work for you.)

# kubeadm join 192.168.132.100:6443 --token 8u9v7h.1nfot2drqnqw8mps \
    --discovery-token-ca-cert-hash sha256:8624e49e1ce94e912ac7c081deabd50196f8526c9a597e0142414204939ff510
# mkdir -p $HOME/.kube
# cp -i /etc/kubernetes/admin.conf $HOME/.kube/config
# chown $(id -u):$(id -g) $HOME/.kube/config

Let’s install the network using Wave

# export kubever=$(kubectl version | base64 | tr -d '\n')
# kubectl apply -f "https://cloud.weave.works/k8s/net?k8s-version=$kubever"

Let’s check Nodes and Pods of our Installation. Note that sometimes it takes a while to put everything Ready and Running, you can watch those commands until everything looks great.

# kubectl get nodes
# kubectl get pods --all-namespaces

———————————————————————————————————————————-

Let’s Install the K8s Dashboard

# vi kubernetes-dashboard-deployment.yaml

Add this content:

# Copyright 2017 The Kubernetes Authors.
#
# Licensed under the Apache License, Version 2.0 (the "License");
# you may not use this file except in compliance with the License.
# You may obtain a copy of the License at
#
#     http://www.apache.org/licenses/LICENSE-2.0
#
# Unless required by applicable law or agreed to in writing, software
# distributed under the License is distributed on an "AS IS" BASIS,
# WITHOUT WARRANTIES OR CONDITIONS OF ANY KIND, either express or implied.
# See the License for the specific language governing permissions and
# limitations under the License.

apiVersion: v1
kind: Namespace
metadata:
  name: kube-system

---

apiVersion: v1
kind: ServiceAccount
metadata:
  labels:
    k8s-app: kubernetes-dashboard
  name: kubernetes-dashboard
  namespace: kube-system

---

kind: Service
apiVersion: v1
metadata:
  labels:
    k8s-app: kubernetes-dashboard
  name: kubernetes-dashboard
  namespace: kube-system
spec:
  ports:
    - port: 443
      targetPort: 8443
      nodePort: 30001
  selector:
    k8s-app: kubernetes-dashboard
  type: NodePort

---

apiVersion: v1
kind: Secret
metadata:
  labels:
    k8s-app: kubernetes-dashboard
  name: kubernetes-dashboard-certs
  namespace: kube-system
type: Opaque

---

apiVersion: v1
kind: Secret
metadata:
  labels:
    k8s-app: kubernetes-dashboard
  name: kubernetes-dashboard-csrf
  namespace: kube-system
type: Opaque
data:
  csrf: ""

---

apiVersion: v1
kind: Secret
metadata:
  labels:
    k8s-app: kubernetes-dashboard
  name: kubernetes-dashboard-key-holder
  namespace: kube-system
type: Opaque

---

kind: ConfigMap
apiVersion: v1
metadata:
  labels:
    k8s-app: kubernetes-dashboard
  name: kubernetes-dashboard-settings
  namespace: kube-system

---

kind: Role
apiVersion: rbac.authorization.k8s.io/v1
metadata:
  labels:
    k8s-app: kubernetes-dashboard
  name: kubernetes-dashboard
  namespace: kube-system
rules:
  # Allow Dashboard to get, update and delete Dashboard exclusive secrets.
  - apiGroups: [""]
    resources: ["secrets"]
    resourceNames: ["kubernetes-dashboard-key-holder", "kubernetes-dashboard-certs", "kubernetes-dashboard-csrf"]
    verbs: ["get", "update", "delete"]
    # Allow Dashboard to get and update 'kubernetes-dashboard-settings' config map.
  - apiGroups: [""]
    resources: ["configmaps"]
    resourceNames: ["kubernetes-dashboard-settings"]
    verbs: ["get", "update"]
    # Allow Dashboard to get metrics.
  - apiGroups: [""]
    resources: ["services"]
    resourceNames: ["heapster", "dashboard-metrics-scraper"]
    verbs: ["proxy"]
  - apiGroups: [""]
    resources: ["services/proxy"]
    resourceNames: ["heapster", "http:heapster:", "https:heapster:", "dashboard-metrics-scraper", "http:dashboard-metrics-scraper"]
    verbs: ["get"]

---

kind: ClusterRole
apiVersion: rbac.authorization.k8s.io/v1
metadata:
  labels:
    k8s-app: kubernetes-dashboard
  name: kubernetes-dashboard
rules:
  # Allow Metrics Scraper to get metrics from the Metrics server
  - apiGroups: ["metrics.k8s.io"]
    resources: ["pods", "nodes"]
    verbs: ["get", "list", "watch"]

---

apiVersion: rbac.authorization.k8s.io/v1
kind: RoleBinding
metadata:
  labels:
    k8s-app: kubernetes-dashboard
  name: kubernetes-dashboard
  namespace: kube-system
roleRef:
  apiGroup: rbac.authorization.k8s.io
  kind: Role
  name: kubernetes-dashboard
subjects:
  - kind: ServiceAccount
    name: kubernetes-dashboard
    namespace: kube-system

---

apiVersion: rbac.authorization.k8s.io/v1
kind: ClusterRoleBinding
metadata:
  name: kubernetes-dashboard
roleRef:
  apiGroup: rbac.authorization.k8s.io
  kind: ClusterRole
  name: kubernetes-dashboard
subjects:
  - kind: ServiceAccount
    name: kubernetes-dashboard
    namespace: kube-system

---

kind: Deployment
apiVersion: apps/v1
metadata:
  labels:
    k8s-app: kubernetes-dashboard
  name: kubernetes-dashboard
  namespace: kube-system
spec:
  replicas: 1
  revisionHistoryLimit: 10
  selector:
    matchLabels:
      k8s-app: kubernetes-dashboard
  template:
    metadata:
      labels:
        k8s-app: kubernetes-dashboard
    spec:
      containers:
        - name: kubernetes-dashboard
          image: kubernetesui/dashboard:v2.0.0-rc7
          imagePullPolicy: Always
          ports:
            - containerPort: 8443
              protocol: TCP
          args:
            - --auto-generate-certificates
            - --namespace=kube-system
            # Uncomment the following line to manually specify Kubernetes API server Host
            # If not specified, Dashboard will attempt to auto discover the API server and connect
            # to it. Uncomment only if the default does not work.
            # - --apiserver-host=http://my-address:port
          volumeMounts:
            - name: kubernetes-dashboard-certs
              mountPath: /certs
              # Create on-disk volume to store exec logs
            - mountPath: /tmp
              name: tmp-volume
          livenessProbe:
            httpGet:
              scheme: HTTPS
              path: /
              port: 8443
            initialDelaySeconds: 30
            timeoutSeconds: 30
          securityContext:
            allowPrivilegeEscalation: false
            readOnlyRootFilesystem: true
            runAsUser: 1001
            runAsGroup: 2001
      volumes:
        - name: kubernetes-dashboard-certs
          secret:
            secretName: kubernetes-dashboard-certs
        - name: tmp-volume
          emptyDir: {}
      serviceAccountName: kubernetes-dashboard
      nodeSelector:
        "kubernetes.io/os": linux
      # Comment the following tolerations if Dashboard must not be deployed on master
      tolerations:
        - key: node-role.kubernetes.io/master
          effect: NoSchedule

---

kind: Service
apiVersion: v1
metadata:
  labels:
    k8s-app: dashboard-metrics-scraper
  name: dashboard-metrics-scraper
  namespace: kube-system
spec:
  ports:
    - port: 8000
      targetPort: 8000
  selector:
    k8s-app: dashboard-metrics-scraper

---

kind: Deployment
apiVersion: apps/v1
metadata:
  labels:
    k8s-app: dashboard-metrics-scraper
  name: dashboard-metrics-scraper
  namespace: kube-system
spec:
  replicas: 1
  revisionHistoryLimit: 10
  selector:
    matchLabels:
      k8s-app: dashboard-metrics-scraper
  template:
    metadata:
      labels:
        k8s-app: dashboard-metrics-scraper
      annotations:
        seccomp.security.alpha.kubernetes.io/pod: 'runtime/default'
    spec:
      containers:
        - name: dashboard-metrics-scraper
          image: kubernetesui/metrics-scraper:v1.0.4
          ports:
            - containerPort: 8000
              protocol: TCP
          livenessProbe:
            httpGet:
              scheme: HTTP
              path: /
              port: 8000
            initialDelaySeconds: 30
            timeoutSeconds: 30
          volumeMounts:
          - mountPath: /tmp
            name: tmp-volume
          securityContext:
            allowPrivilegeEscalation: false
            readOnlyRootFilesystem: true
            runAsUser: 1001
            runAsGroup: 2001
      serviceAccountName: kubernetes-dashboard
      nodeSelector:
        "kubernetes.io/os": linux
      # Comment the following tolerations if Dashboard must not be deployed on master
      tolerations:
        - key: node-role.kubernetes.io/master
          effect: NoSchedule
      volumes:
        - name: tmp-volume
          emptyDir: {}

Than Apply the Yaml File

# kubectl apply -f kubernetes-dashboard-deployment.yaml

And check again to see if the Dashboard is Up and Running (note again that the pod might take a while to be up and running, just watch the command to see it working)

# kubectl get pods --all-namespaces

Ensure that we have expose correctly the external port (PortNode) 30001 so it can be possible access the Dashboard over the internet.

# kubectl -n kube-system get services

———————————————————————————————————————————-

Adjust SSL Certificates

# kubectl delete secret kubernetes-dashboard-certs -n kube-system
# mkdir $HOME/certs
# cd $HOME/certs
# openssl genrsa -out dashboard.key 2048
# openssl rsa -in dashboard.key -out dashboard.key
# openssl req -sha256 -new -key dashboard.key -out dashboard.csr -subj '/CN=localhost'
# openssl x509 -req -sha256 -days 365 -in dashboard.csr -signkey dashboard.key -out dashboard.crt
# kubectl create secret generic kubernetes-dashboard-certs --from-file=dashboard.key --from-file=dashboard.crt -n kube-system

Reboot the System

# shutdown -rf now

———————————————————————————————————————————-

Now, let’s create a file named adminuser.yaml (so we can login to the DashBoard) and save the content with this:

apiVersion: v1
kind: ServiceAccount
metadata:
  name: admin-user
  namespace: kube-system

Than Apply

# kubectl apply -f adminuser.yaml

And, create a file named permissions.yaml to give permissions to the user we’ve created with the content:

apiVersion: rbac.authorization.k8s.io/v1
kind: ClusterRoleBinding
metadata:
  name: admin-user
roleRef:
  apiGroup: rbac.authorization.k8s.io
  kind: ClusterRole
  name: cluster-admin
subjects:
- kind: ServiceAccount
  name: admin-user
  namespace: kube-system

Than Apply

# kubectl apply -f permissions.yaml

Done that, it’s time to login to the DashBoard! But first, we need to collect the Token we’ll need to use in order to access. Executing the command, copy the part that says token, but only the token itself.

# kubectl -n kube-system describe secret $(kubectl -n kube-system get secret | grep admin-user | awk '{print $1}')

Copy only the token that will look something like this (again this is just the example my script generates, each installation will generate an unique one, be aware of that):

eyJhbGciOiJSUzI1NiIsImtpZCI6IlJvVEotbUdDUndjbXBxdUJvbU41ekxYOE9TWTdhM1NFR1dSc3g5Ul9Dbk0ifQ.eyJpc3MiOiJrdWJlcm5ldGVzL3NlcnZpY2VhY2NvdW50Iiwia3ViZXJuZXRlcy5pby9zZXJ2aWNlYWNjb3VudC9uYW1lc3BhY2UiOiJrdWJlLXN5c3RlbSIsImt1YmVybmV0ZXMuaW8vc2VydmljZWFjY291bnQvc2VjcmV0Lm5hbWUiOiJhZG1pbi11c2VyLXRva2VuLTlzajl3Iiwia3ViZXJuZXRlcy5pby9zZXJ2aWNlYWNjb3VudC9zZXJ2aWNlLWFjY291bnQubmFtZSI6ImFkbWluLXVzZXIiLCJrdWJlcm5ldGVzLmlvL3NlcnZpY2VhY2NvdW50L3NlcnZpY2UtYWNjb3VudC51aWQiOiI4MjgyYWI5NS03YTViLTQzOTItYWQwNy0yZTY1MTc2YTgxNjIiLCJzdWIiOiJzeXN0ZW06c2VydmljZWFjY291bnQ6a3ViZS1zeXN0ZW06YWRtaW4tdXNlciJ9.NKWvADh7osIFng0xgNpf2C2FBCsijXZr4HOgHTFVZS_TWMLT3wPt6rXhHnnDTu6HXUWd0era9GgXouemliTJKA-HrE8R7ArW88m1jAckR4xVquTLf0Vr1na_nmBVuMTiW9W55b6cr-hZuWuyI4F–91N43-6DzdMXpesHaur6UFojS5dUPoHybIr7HUkLWq8InV7fON06r6zWHCLQVftTYtyaAqbvlJnqcRNlnbyobsRWryjUXQRZrC8Fu1QwCe9aLVmcBByG1Tp3Ao8sA_W-ue8ISpat6_shLJa5zO9vpJEYOzfkdDFhAy6MigXl4b1T4J2q1bhpuIX82dmLVhboA

———————————————————————————————————————————-

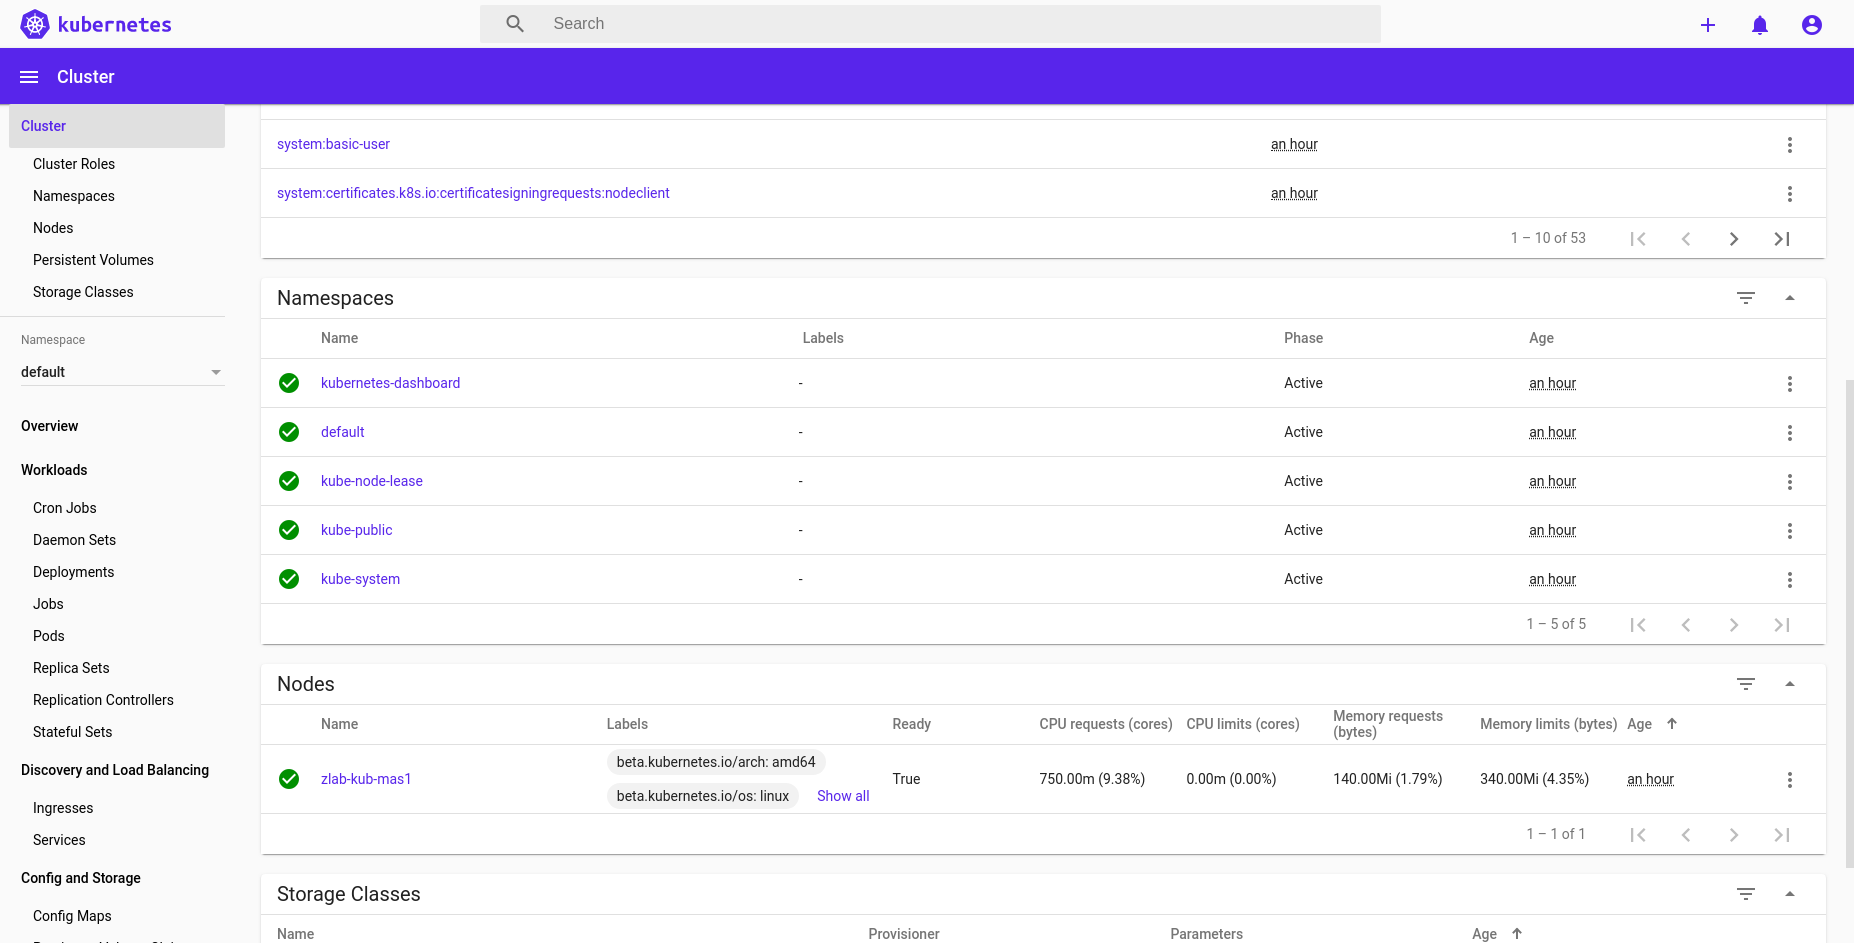
Copied the token, go to your Navigator and type: https://192.168.132.100:30001 choose token, paste the token your script create and you’re inside the DashBoard.

And, the last part, with the Master ready to receive the Nodes, let’s join them!

Log into every Worker node and Run the following command you copied when you run the command kubeadm init at the Masters setup:

# kubeadm join 192.168.132.100:6443 --token 8u9v7h.1nfot2drqnqw8mps \
    --discovery-token-ca-cert-hash sha256:8624e49e1ce94e912ac7c081deabd50196f8526c9a597e0142414204939ff510

At the same time you’re running the command on the Nodes, open the “Nodes” session on the Dashboard to check the workers being joined to the Cluster.

That’s it, next steps will be Deploying some application on this infrastructure and make it Reliable – BUT – this is the Subject for a future Post. Hope you all Enjoy, Comment and Share.

Any Comments and Improvements just let me know.

How to Deploy MySQL + PHPMyAdmin Environment Container using Docker

Hello People!

Nothing better than start figuring out what is the difference between a Solution build in the old style and now with Containers using Docker.

It’s really a HUGE difference starting at the point that to Deploy it takes us simple 5 minutes or Less (with the O.S already installed of course).

Ok, no matter you’re using CentOS or Red Hat – OR – another distribution. The article today will take care about creating a standard environment for Database administration using MySQL and PHPMyAdmin using Docker.

We will create 2 containers, One to MySQL Database and Another to PHPMyAdmin.

So, Joao, can we create one unique Container with both solution? Yes! we can, but today the idea is to show how containers can talk each other using same network infrastructure and how things works at the Docker Environment.

I’m really sure that after that you gonna start understanding better how the entire things works.

Basically we will:

1 – Create the Network for both MySQL and PHPMyAdmin Containers
2 – Create the Filesystem that will make the modifications on Container (MySQL) Persistent
3 – Create the MYSQL Container
4 – Create the PHPMyAdmin Container
5 – Run everything together at the Navigator

Can we go? GOOD!!

1st Step: Create Network

# docker network create mysqlnet

2nd Step: Create the Filesystem for MySQL Database that we will map to the Container so it could be possible data being Persistent.

# mkdir -p /opt/mysql

3th Step: Create the MySQL Container with root password set to “new4you”, using the network created (mysqlnet), with the container name set to mysqlsrv, exposing port 3306 and with the latest mysql image from Docker registry.

# docker run -d \
--name mysqlsrv \
--network mysqlnet \
-e MYSQL_ROOT_PASSWORD="new4you" \
-v /opt/mysql:/var/lib/mysql \
-p 3306:3306 \
mysql

4th Step: Create the PHPMyAdmin Container with the name phpmyadminsrv, using the container (database host) mysqlsrv, in the network mysqlnet (so it could be possible the containers having the same network providing communication between them), mapping the port 80 to 8080 with the latest PHPMyAdmin image available.

# docker run -d \
    --name phpmyadminsrv \
    --network mysqlnet \
    -e PMA_HOST=mysqlsrv \
    -p 8080:80 \
    phpmyadmin/phpmyadmin

Ok, done these steps, just go to the navigator and type the IP address of the Docker Host that we create those containers pointed to the port 8080, something like this:

http://youhostip:8080

You should receive a page something like this:

That’s it!

Let’s improve?

Let’s make those containers auto start after machine boot:

We will now create 2 systemd files (create 2 services), one for mysqlsrv container and another to phpmyadminsrv.

First we will start the mysqlsrv container after docker service is up and running and, after, we start the phpmyadminsrv after mysqlsrv service is running. EASY.

# vi /etc/systemd/system/mysqlsrv.service

Add the following content:

[Unit]
Description=MySQL container
Requires=docker.service
After=docker.service

[Service]
Restart=always
ExecStart=/usr/bin/docker start mysqlsrv
ExecStop=/usr/bin/docker stop mysqlsrv

[Install]
WantedBy=default.target

Let’s make it enabled after the system start.

# systemctl enable mysqlsrv.service

Now, the PHPMyAdmin service:

# vi /etc/systemd/system/phpmyadminsrv.service

Add the following content:

[Unit]
Description=PHPMyAdmin container
Requires=mysqlsrv.service
After=mysqlsrv.service

[Service]
Restart=always
ExecStart=/usr/bin/docker start phpmyadminsrv
ExecStop=/usr/bin/docker stop phpmyadminsrv

[Install]
WantedBy=default.target

So, for the last, we’ll make the PHPMyAdmin service (container) start after mysqlsrv container (service) is up and running:

# systemctl enable phpmyadminsrv.service

Reboot the machine ans check if both are online and test at the navigator again.

Beautiful isn’t it?

Any question or concerns and even improvements, just write down the comments and I’ll be more than happy to answer or adapt the post.

See you guys!

How to Deploy Kubernetes (with WEB UI) on CentOS 7 under KVM

dashboard-ui-kubernetes

Hello Guys,

One of the best way to practice what you’ve been studying is to build a LAB. In this case, a Kubernetes LAB using minikube.

I’ll be posting an entire roadmap to Build a Kubernetes Cluster with a Master and 3 Workers.

Too figure out what is what, please stay tuned on my upcoming posts.

This is the step number one to Build this LAB Environment.

So, let’s stop talking and let’s start Deploying.

First, why “under KVM”? Well, this is my actual Virtualization tool I have installed on my PC, so, it’s a little bit different regarding the most common tutorials over the internet and differs a little bit from some steps.

This is my Centos 7 VM specs:

CPU: 8
HDD: 100GB
MEM: 8GB
CD Image: CentOS 7.7
Hostname: zlab-kub-mas1
IP: 192.168.122.100

Well, after installing a fresh OS and updated, we first need to install Docker.

I will install everything as root right?

Some prereqs first:

yum install -y yum-utils \
device-mapper-persistent-data \
lvm2

Than, we need install the Docker repository. I choose Docker Community Edition.

yum-config-manager \
    --add-repo \
    https://download.docker.com/linux/centos/docker-ce.repo

Let’s install and make sure it will start with the machine after reboots:

yum install docker-ce docker-ce-cli containerd.io
systemctl start docker
systemctl enable docker

Now, let’s install kubectl that will allow us run a lot of useful commands at the Kubernetes environment:

curl -LO https://storage.googleapis.com/kubernetes-release/release/`curl -s https://storage.googleapis.com/kubernetes-release/release/stable.txt`/bin/linux/amd64/kubectl

Make the file executable:

chmod +x ./kubectl

Move it to the PATH environment so we can run it everywhere:

mv ./kubectl /usr/local/bin/kubectl

Let’s ensure that the command is running and installed:

kubectl version --client

Now, the best part: Install the minikube!

curl -Lo minikube https://storage.googleapis.com/minikube/releases/latest/minikube-linux-amd64 \
  && chmod +x minikube

Here is the point some tutorials may differ from this one. As we’re running on a Virtualized tool already, create another KVM or VirtualBox doesn’t make sense and put this working it’s a really pain in the neck, so we can proceed using Docker!

minikube start --vm-driver=none

Tip: When we don’t set a vm-driver, minikube installation uses Docker as our run environment.

Let’s check the installation running

minikube status

You need to see something like this:

[root@zlab-kub-mas1 ~]# minikube status
host: Running
kubelet: Running
apiserver: Running
kubeconfig: Configured

After minikube is up and running, let’s Deploy the Dashboard UI feature:

Let’s download the yaml template for this and save as dashboard.yaml:

curl -L0 https://raw.githubusercontent.com/kubernetes/dashboard/v2.0.0-beta8/aio/deploy/recommended.yaml >> dashboard.yaml

Than, we need edit and add some NodePort in a part of this file created (dashboard.yaml) in this section:

The part that is:

kind: Service
apiVersion: v1
metadata:
labels:
k8s-app: kubernetes-dashboard
name: kubernetes-dashboard
namespace: kubernetes-dashboard
spec:
ports:
- port: 443
targetPort: 8443
selector:
k8s-app: kubernetes-dashboard

Needs to add those lines:

kind: Service
apiVersion: v1
metadata:
labels:
k8s-app: kubernetes-dashboard
name: kubernetes-dashboard
namespace: kubernetes-dashboard
spec:
type: NodePort
ports:
- port: 443
targetPort: 8443
nodePort: 30001
selector:
k8s-app: kubernetes-dashboard

Than run:

kubectl apply -f dashboard.yaml

After, let’s take care of the SSL so it could be possible to us connect from the external network:

mkdir $HOME/certs

cd $HOME/certs

openssl genrsa -out dashboard.key 2048

openssl rsa -in dashboard.key -out dashboard.key

openssl req -sha256 -new -key dashboard.key -out dashboard.csr -subj '/CN=localhost'

openssl x509 -req -sha256 -days 365 -in dashboard.csr -signkey dashboard.key -out dashboard.crt

kubectl create secret generic kubernetes-dashboard-certs --from-file=dashboard.key --from-file=dashboard.crt -n kubernetes-dashboard

Well, here starts a little trick part, the part that we will first create an account to access the Dashboard, give the permissions and than be able to use the token generated to login to the Dashboard.

Create a file named adminuser.yaml and save the content with this:

apiVersion: v1
kind: ServiceAccount
metadata:
  name: admin-user
  namespace: kubernetes-dashboard

Than, run

kubectl apply -f adminuser.yaml

After user creation, let’s give the permissions.

Create another yaml file named permission.yaml and save the content with this:

apiVersion: rbac.authorization.k8s.io/v1
kind: ClusterRoleBinding
metadata:
  name: admin-user
roleRef:
  apiGroup: rbac.authorization.k8s.io
  kind: ClusterRole
  name: cluster-admin
subjects:
- kind: ServiceAccount
  name: admin-user
  namespace: kubernetes-dashboard

After creation, run the command:

kubectl apply -f permissions.yaml

Done this, let’s collect the token needed:

kubectl -n kubernetes-dashboard describe secret $(kubectl -n kubernetes-dashboard get secret | grep admin-user | awk '{print $1}')

The command will show something like this, copy the bold section for the future login.

[root@zlab-kub-mas1 ~]# kubectl -n kubernetes-dashboard describe secret $(kubectl -n kubernetes-dashboard get secret | grep admin-user | awk '{print $1}')
Name:         admin-user-token-hx69p
Namespace:    kubernetes-dashboard
Labels:       
Annotations:  kubernetes.io/service-account.name: admin-user
              kubernetes.io/service-account.uid: 2adb39fd-ddb8-47e9-ae6a-2c64d9243358

Type:  kubernetes.io/service-account-token

Data
====
ca.crt:     1066 bytes
namespace:  20 bytes
token:      eyJhbGciOiJSUzI1NiIsImtpZCI6IlZNNkdGWkNhRG9GRDMzS2lGakZPRFJySG94VUI3YkNOWlhEZ0pnaF9JTlUifQ.eyJpc3MiOiJrdWJlcm5ldGVzL3NlcnZpY2VhY2NvdW50Iiwia3ViZXJuZXRlcy5pby9zZXJ2aWNlYWNjb3VudC9uYW1lc3BhY2UiOiJrdWJlcm5ldGVzLWRhc2hib2FyZCIsImt1YmVybmV0ZXMuaW8vc2VydmljZWFjY291bnQvc2VjcmV0Lm5hbWUiOiJhZG1pbi11c2VyLXRva2VuLWh4NjlwIiwia3ViZXJuZXRlcy5pby9zZXJ2aWNlYWNjb3VudC9zZXJ2aWNlLWFjY291bnQubmFtZSI6ImFkbWluLXVzZXIiLCJrdWJlcm5ldGVzLmlvL3NlcnZpY2VhY2NvdW50L3NlcnZpY2UtYWNjb3VudC51aWQiOiIyYWRiMzlmZC1kZGI4LTQ3ZTktYWU2YS0yYzY0ZDkyNDMzNTgiLCJzdWIiOiJzeXN0ZW06c2VydmljZWFjY291bnQ6a3ViZXJuZXRlcy1kYXNoYm9hcmQ6YWRtaW4tdXNlciJ9.Qdsy_gd9hKbZZXjqmb8qXbO66s7CYAWl-x08vvPI31uZiSqGAOgF5gbfL3e-r_60kgTcXR5QFc-Mn_-BzXk-xUwZwRyefRJtWGCNKGQbVBl2y16C01y1kbs5iy9Ha2DRUpw6X3VjOeWCsKD7VUM6jIW9JpFk7Oc8wDn5NQQgHrNQkPBzvcckdeuMOq-NfnXixKLxuatQDP6nrIHwFDXRdo1vU6rPQczkTFmU-xTtcmTuGwzsysbnExrthoPbdtFbkILsC0brPJQHyIl8pl2E1O-WRSWvZmgXJNYgwcQsMSEzu79ktsij_NuFBo_lNSe_p6xBe7HY9IaWDTwZUlUqEQ

Now, that we have user and permission, let’s make some config so the server can start and run everything automatically:

systemctl enable kubelet.service
systemctl stop firewalld
systemctl disable firewalld

Let’s disable also SELINUX 🙂

On /etc/selinux/config file set SELINUX=disabled

Save the file

REBOOT

Once rebooted go to your web navigator and type https://192.168.122.100:30001/#/login

When requesting login, select Token and paste the Token we collect some steps ago.

So, here’s is some basic overview in the faster way to make minikube installed and the Dashboard UI for getting great experience working with Kubernetes.

In the next posts I’ll show the next steps to build a Cluster with 3 Worker Nodes.

Special thanks to Fernando Rubens, DevOps fella who gives me some great tips to improve even more this tutorial. ❤ #go go go

I hope you all like this post and, if so, please give some feedback or improvement, share it and comment.

See ya!

How to build a NIM Server on AIX 6.1 from the Scratch :: Part 1

Hello Fellas!

Here is a good how to build from the Scratch a NIM Server under AIX 6.1. (The operation for version 7.1 stills the same, anyway).

Well, for this environment i dedicate one vg for this NIM as best practices. So, let’s take a look on our vgs:

# lspv
hdisk0          00047ff1211f84d2                    rootvg          active      
hdisk1          00047ff12252331b                    nimvg           active  

Remembering our OS version

# oslevel -s
6100-08-02-1316

Checking fot the NIM packages already installed by default regarding nim environment:

# lslpp -l | grep nim
bos.sysmgt.nim.client     6.1.8.15  COMMITTED  Network Install Manager -

So, with our AIX 6.1 cd0 mounted, let’s install the nim SPOT and nim MASTER packages:

# installp -Ld /dev/cd0 | grep nim
X11.Dt:X11.Dt.helpmin:6.1.2.0::I:T:::::N:AIX CDE Minimum Help Files ::::0:0846:
X11.msg.DE_DE:X11.msg.DE_DE.Dt.helpmin:6.1.4.0::I:T:::::N:AIX CDE Minimum Help Files - German (UTF)::::0::
X11.msg.EN_US:X11.msg.EN_US.Dt.helpmin:6.1.4.0::I:T:::::N:AIX CDE Minimum Help Files - U.S. English (UTF)::::0::
X11.msg.FR_FR:X11.msg.FR_FR.Dt.helpmin:6.1.4.0::I:T:::::N:AIX CDE Minimum Help Files - French (UTF)::::0::
X11.msg.IT_IT:X11.msg.IT_IT.Dt.helpmin:6.1.4.0::I:T:::::N:AIX CDE Minimum Help Files - Italian (UTF)::::0::
X11.msg.JA_JP:X11.msg.JA_JP.Dt.helpmin:6.1.4.0::I:T:::::N:AIX CDE Minimum Help Files - Japanese (UTF)::::0::
X11.msg.Ja_JP:X11.msg.Ja_JP.Dt.helpmin:6.1.4.0::I:T:::::N:AIX CDE Minimum Help Files - Japanese::::0::
X11.msg.de_DE:X11.msg.de_DE.Dt.helpmin:6.1.4.0::I:T:::::N:AIX CDE Minimum Help Files - German::::0::
X11.msg.en_US:X11.msg.en_US.Dt.helpmin:6.1.0.0::I:T:::::N:AIX CDE Minimum Help Files - U.S. English::::0:0747:
X11.msg.fr_FR:X11.msg.fr_FR.Dt.helpmin:6.1.4.0::I:T:::::N:AIX CDE Minimum Help Files - French::::0::
X11.msg.it_IT:X11.msg.it_IT.Dt.helpmin:6.1.4.0::I:T:::::N:AIX CDE Minimum Help Files - Italian::::0::
X11.msg.ja_JP:X11.msg.ja_JP.Dt.helpmin:6.1.4.0::I:T:::::N:AIX CDE Minimum Help Files - Japanese IBM-eucJP::::0::
bos.sysmgt:bos.sysmgt.nim.client:6.1.8.15::I:C:::::N:Network Install Manager - Client Tools ::::0:1316:
bos.sysmgt:bos.sysmgt.nim.master:6.1.8.15::I:T:::::N:Network Install Manager - Master Tools ::::0:1316:
bos.sysmgt:bos.sysmgt.nim.spot:6.1.8.15::I:T:::::N:Network Install Manager - SPOT ::::0:1316:

Let’s install first the nim.spot filesets:

# installp -agXd /dev/cd0 bos.sysmgt.nim.spot
+-----------------------------------------------------------------------------+
Pre-installation Verification...
+-----------------------------------------------------------------------------+
Verifying selections...done
Verifying requisites...done
Results... SUCCESSES --------- Filesets listed in this section passed pre-installation verification and will be installed. Selected Filesets ----------------- bos.sysmgt.nim.spot 6.1.8.15 # Network Install Manager - SPOT << End of Success Section >> +-----------------------------------------------------------------------------+ BUILDDATE Verification ... +-----------------------------------------------------------------------------+ Verifying build dates...done FILESET STATISTICS ------------------ 1 Selected to be installed, of which: 1 Passed pre-installation verification ---- 1 Total to be installed +-----------------------------------------------------------------------------+ Installing Software... +-----------------------------------------------------------------------------+ installp: APPLYING software for: bos.sysmgt.nim.spot 6.1.8.15 . . . . . << Copyright notice for bos.sysmgt >> . . . . . . . Licensed Materials - Property of IBM 5765G6200 Copyright International Business Machines Corp. 1993, 2013. All rights reserved. US Government Users Restricted Rights - Use, duplication or disclosure restricted by GSA ADP Schedule Contract with IBM Corp. . . . . . << End of copyright notice for bos.sysmgt >>. . . . Finished processing all filesets. (Total time: 16 secs). +-----------------------------------------------------------------------------+ Summaries: +-----------------------------------------------------------------------------+ Installation Summary -------------------- Name Level Part Event Result ------------------------------------------------------------------------------- bos.sysmgt.nim.spot 6.1.8.15 USR APPLY SUCCESS #

Then, we can install the nim.master filesets:

# installp -agXd /dev/cd0 bos.sysmgt.nim.master
+-----------------------------------------------------------------------------+
Pre-installation Verification...
+-----------------------------------------------------------------------------+
Verifying selections...done
Verifying requisites...done
Results...

SUCCESSES
---------
Filesets listed in this section passed pre-installation verification
and will be installed.

Selected Filesets
-----------------
bos.sysmgt.nim.master 6.1.8.15 # Network Install Manager - Ma...

<< End of Success Section >>

+-----------------------------------------------------------------------------+
BUILDDATE Verification ...
+-----------------------------------------------------------------------------+
Verifying build dates...done
FILESET STATISTICS
------------------
1 Selected to be installed, of which:
1 Passed pre-installation verification
----
1 Total to be installed

+-----------------------------------------------------------------------------+
Installing Software...
+-----------------------------------------------------------------------------+

installp: APPLYING software for:
bos.sysmgt.nim.master 6.1.8.15

. . . . . << Copyright notice for bos.sysmgt >> . . . . . . .
Licensed Materials - Property of IBM

5765G6200
Copyright International Business Machines Corp. 1993, 2013.

All rights reserved.
US Government Users Restricted Rights - Use, duplication or disclosure
restricted by GSA ADP Schedule Contract with IBM Corp.
. . . . . << End of copyright notice for bos.sysmgt >>. . . .

Successfully updated the Kernel Authorization Table.
Successfully updated the Kernel Role Table.
Successfully updated the Kernel Command Table.
Successfully updated the Kernel Device Table.
Successfully updated the Kernel Object Domain Table.
Successfully updated the Kernel Domains Table.
Finished processing all filesets. (Total time: 42 secs).

+-----------------------------------------------------------------------------+
Summaries:
+-----------------------------------------------------------------------------+

Installation Summary
--------------------
Name Level Part Event Result
-------------------------------------------------------------------------------
bos.sysmgt.nim.master 6.1.8.15 USR APPLY SUCCESS

After this 2 operations, we may have the filesets needed for the nim server configuration:

# lslpp -l | grep nim
bos.sysmgt.nim.client     6.1.8.15  COMMITTED  Network Install Manager -
bos.sysmgt.nim.master     6.1.8.15  COMMITTED  Network Install Manager -
bos.sysmgt.nim.spot       6.1.8.15  COMMITTED  Network Install Manager - SPOT
bos.sysmgt.nim.client     6.1.8.15  COMMITTED  Network Install Manager -

Starting the setup (using smit – easier):


# smit nim

Image 1.

  1. Select: Configure the NIM Environment

Image 2.

  1. Select: Configure a Basic NIM Environment (Easy Startup)

Image 3.

  1. Primary Network Interface for the NIM Master: Choose the network card used for the NIM network connection;
  2. Input device for installation images: In our case, i choose cd0 as the mounted AIX 6.1 ISO from the VIOS;
  3. LPP SOURCE Name: I Choose AIX61DISK1LPP to inform that this is the Disk 1 for the AIX 6.1 Installation media;
  4. Filesystem SIZE (MB): 4000 = 4GB (The size of the ISO file);
  5. VOLUME GROUP for new filesystem: nimvg (as the vg created for holding the files);

Image 4.

  1. SPOT Name: I choose AIX61DISK1SPOT to identify what the spot is about;
  2. Filesystem SIZE (MB): 650, as the space for swap files during installation/processing. The minimum is 500M.
  3. VOLUME GROUP for new filesystem: Again the nimvg as the vg defined for this use.

Image 5.

  1. Remove all newly added NIM definitions and filesystems if any part of this operation fails?: Yes, in case of fails, bring everything to the same place.

Image 6.

After all setting being inputed, hit enter, and start the Resource creation. (Be carefully, umount the /dev/cd0 to avoid mounting problems if using this drive as source for this LPP).

Image 7.

(After some time… ) Installation Finish.

So, next part we will talk about creating new LPP/SPOT resources. It’ll be available soon, stay tunned!

How to know witch process is running in a particular port on AIX using KDB

Fellas, here is the gig, please, don’t cry! 😀

Suppose your application is not working well (or crashed, or stops and cannot goes online again) because someone install a new software that uses the same port as the application and leave the server, simple like this – believe (it happens). What a cool thing right?

Well, In this example, i will use the port 1334, but, in this question itself we will discuss when you need to remove a socket from a determined port but the rmsock command itself cannot tell you – WITCH PROCESS is being held the process, something like this:

# netstat -Aan |grep *.1334
f1000e0000180bb8 tcp4       0      0  *.1334                *.*                   LISTEN

Normal case:

# rmsock f1000e0000180bb8 tcpcb
The socket 0xf1000e0000180808 is being held by proccess 3211434 (writesrv).

Note that, sometimes AIX can give you all the job listing the PID 3211434, the process writesrv but, sometimes…

Worst case (and that’s what we gonna discuss it now):

# rmsock f1000e0000180bb8 tcpcb
The socket 0xf1000e0000180808 is being held by Kernel/Kernel Extension.

And now i ask you: WTF?

Now, let’s use KDB to starting playing around. Note that the output is too detailed, so you need to take your time to check it out what you need!

PS: If the protocol used by the socket is UDP, you need to change to “inpcb” instead of “tcbcp”.

Back to Life!

# kdb
           START              END 
0000000000001000 00000000058A0000 start+000FD8
F00000002FF47600 F00000002FFDF9C8 __ublock+000000
000000002FF22FF4 000000002FF22FF8 environ+000000
000000002FF22FF8 000000002FF22FFC errno+000000
F1000F0A00000000 F1000F0A10000000 pvproc+000000
F1000F0A10000000 F1000F0A18000000 pvthread+000000
read vscsi_scsi_ptrs OK, ptr = 0x5AB0380
(0)>

Then, you type: sockinfo f1000e0000180bb8 tcpcb

(0)> sockinfo f1000e0000180bb8 tcpcb
---- TCPCB ----(@ F1000E0000180BB8)----
    seg_next......@F1000E0000180BB8  seg_prev......@F1000E0000180BB8  
    t_softerror... 00000000 t_state....... 00000001 (LISTEN)
    t_timer....... 00000000 (TCPT_REXMT)
    t_timer....... 00000000 (TCPT_PERSIST)
    t_timer....... 00000000 (TCPT_KEEP)
    t_timer....... 00000000 (TCPT_2MSL)
    t_rxtshift.... 00000000 t_rxtcur...... 00000006 t_dupacks..... 00000000 
    t_maxseg...... 000005B4 t_force....... 00000000 
    t_flags....... 00000000 ()
    t_oobflags.... 00000000 ()
    t_template....@0000000000000000  t_inpcb.......@F1000E0000180AA0  
    t_iobc........ 00000000 t_timestamp... 22B9A601 snd_una....... 00000000 
    snd_nxt....... 00000000 snd_up........ 00000000 snd_wl1....... 00000000 
    snd_wl2....... 00000000 iss........... 00000000 
    snd_wnd....... 0000000000000000 rcv_wnd....... 0000000000000000 
    rcv_nxt....... 00000000 rcv_up........ 00000000 irs........... 00000000 
    snd_wnd_scale. 00000000 rcv_wnd_scale. 00000000 req_scale_sent 00000000 
    req_scale_rcvd 00000000 last_ack_sent. 00000000 timestamp_rec. 00000000 
    timestamp_age. 00000006 rcv_adv....... 00000000 snd_max....... 00000000 
    snd_cwnd...... 000000003FFFC000        snd_ssthresh.. 000000003FFFC000 
    t_idle........ 00000006 t_rtt......... 00000000 t_rtseq....... 00000000 
    t_srtt........ 00000000 t_rttvar...... 00000006 t_rttmin...... 00000002 
    max_rcvd...... 0000000000000000        max_sndwnd.... 0000000000000000 
    t_peermaxseg.. 000005B4 snd_in_pipe... 00000000 
    sack_data.....@0000000000000000         snd_recover... 00000000 
    snd_high...... 00000000 snd_ecn_max... 00000000 snd_ecn_clear. 00000000 
    t_splice_with.@0000000000000000         t_splice_flags 00000000 


-------- TCB --------- INPCB  INFO ----(@ F1000E0000180AA0)----
    next........@0000000000000000  prev........@0000000000000000  
    head........@00000000061DDC00  faddr_6.....@F1000E0000180AC0  
    iflowinfo... 00000000 fport....... 00000000 fatype...... 00000000 
    oflowinfo... 00000000 lport....... 00000536 latype...... 00000000 
    laddr_6.....@F1000E0000180AD8  socket......@F1000E0000180808  
    ppcb........@F1000E0000180BB8  route_6.....@F1000E0000180AF8  
    ifa.........@0000000000000000  flags....... 00000400 
    proto....... 00000000 tos......... 00000000 ttl......... 0000003C 
(0)> more (^C to quit) ?

Let’s hit ENTER

rcvttl...... 00000000 rcvif.......@0000000000000000  
    options.....@0000000000000000  refcnt...... 00000000 
    lock........ 0000000000000000  rc_lock..... 0000000000000000 
    moptions....@0000000000000000  hash.next...@F1000A002C047D10  
    hash.prev...@F1000A002C047D10  timewait.nxt@0000000000000000  
    timewait.prv@0000000000000000  inp_v6opts  @0000000000000000  
    inp_pmtu....@0000000000000000  inp_fastlo..@0000000000000000  

---- SOCKET INFO ----(@ F1000E0000180808)----
    type........ 0001 (STREAM)
    opts........ 0002 (ACCEPTCONN)
    linger...... 0000 state....... FFFF8080 (PRIV)
    pcb.....@F1000E0000180AA0  proto...@00000000061B5688  
    lock....@F1000E0000166A80  head....@0000000000000000  
    q0......@0000000000000000  q.......@0000000000000000  
    q0len....... 0000 qlen........ 0000 qlimit...... 0005 
    timeo....... 0000 error....... 0000 special..... 0E08 
    pgid.... 0000000000000000  oobmark. 0000000000000000 

snd:cc...... 0000000000000000  hiwat... 0000000000004000 
    mbcnt... 0000000000000000  mbmax... 0000000000010000 
    lowat... 0000000000001000  mb......@0000000000000000  
    sel.....@0000000000000000  events...... 0000 
    iodone.. 00000000          ioargs..@0000000000000000  
    lastpkt.@0000000000000000  wakeone. FFFFFFFFFFFFFFFF 
    timer...@0000000000000000  timeo... 00000000 
    flags....... 0000 ()
    wakeup.. 00000000          wakearg.@0000000000000000  
    lockwtg. FFFFFFFFFFFFFFFF 

MBUF LIST

rcv:cc...... 0000000000000000  hiwat... 0000000000004000 
    mbcnt... 0000000000000000  mbmax... 0000000000010000 
    lowat... 0000000000000001  mb......@0000000000000000  
    sel.....@0000000000000000  events...... 0000 
    iodone.. 00000000          ioargs..@0000000000000000  
    lastpkt.@0000000000000000  wakeone. FFFFFFFFFFFFFFFF 
    timer...@0000000000000000  timeo... 00000000 
    flags....... 0000 ()
    wakeup.. 00000000          wakearg.@0000000000000000

Hit ENTER again

lockwtg. FFFFFFFFFFFFFFFF  

MBUF LIST

    tpcb....@0000000000000000  fdev_ch.@0000000000000000  
    sec_info@0000000000000000  qos.....@0000000000000000  
    gidlist.@0000000000000000  private.@0000000000000000  
    uid..... 00000000 bufsize. 00000000 threadcnt00000000 
    nextfree@0000000000000000  
    siguid.. 00000000 sigeuid. 00000000 sigpriv. 00000000 
    sndtime. 0000000000000000  sec  0000000000000000  usec 
    rcvtime. 0000000000000000  sec  0000000000000000  usec 
    saioq...@0000000000000000  saioqhd.@0000000000000000  
    accept.. 00000000008F001F  frcatime 00000000 
    isnoflgs 00000000 ()
    rcvlen.. 0000000000000000  frcaback@0000000000000000  
    frcassoc@0000000000000000  frcabckt 0000000000000000 
    iodone.. 00000000          iodonefl 00000000 ()
    ioarg...@0000000000000000  refcnt.. 0000000000000001 
    trclev........... 0001 

proc/fd:  49/3
proc/fd: fd: 3
              SLOT NAME     STATE      PID    PPID          ADSPACE  CL #THS

pvproc+00C400   49*writesrv ACTIVE 03100AA 02E0078 000000081C327400   0 0001


(0)> 

The complete command show this (for this particular process):

PS: Interesting information that you gonna use are in bold.

---- TCPCB ----(@ F1000E0000180BB8)----
    seg_next......@F1000E0000180BB8  seg_prev......@F1000E0000180BB8  
    t_softerror... 00000000 t_state....... 00000001 (LISTEN)
    t_timer....... 00000000 (TCPT_REXMT)
    t_timer....... 00000000 (TCPT_PERSIST)
    t_timer....... 00000000 (TCPT_KEEP)
    t_timer....... 00000000 (TCPT_2MSL)
    t_rxtshift.... 00000000 t_rxtcur...... 00000006 t_dupacks..... 00000000 
    t_maxseg...... 000005B4 t_force....... 00000000 
    t_flags....... 00000000 ()
    t_oobflags.... 00000000 ()
    t_template....@0000000000000000  t_inpcb.......@F1000E0000180AA0  
    t_iobc........ 00000000 t_timestamp... 22B9A601 snd_una....... 00000000 
    snd_nxt....... 00000000 snd_up........ 00000000 snd_wl1....... 00000000 
    snd_wl2....... 00000000 iss........... 00000000 
    snd_wnd....... 0000000000000000 rcv_wnd....... 0000000000000000 
    rcv_nxt....... 00000000 rcv_up........ 00000000 irs........... 00000000 
    snd_wnd_scale. 00000000 rcv_wnd_scale. 00000000 req_scale_sent 00000000 
    req_scale_rcvd 00000000 last_ack_sent. 00000000 timestamp_rec. 00000000 
    timestamp_age. 00000006 rcv_adv....... 00000000 snd_max....... 00000000 
    snd_cwnd...... 000000003FFFC000        snd_ssthresh.. 000000003FFFC000 
    t_idle........ 00000006 t_rtt......... 00000000 t_rtseq....... 00000000 
    t_srtt........ 00000000 t_rttvar...... 00000006 t_rttmin...... 00000002 
    max_rcvd...... 0000000000000000        max_sndwnd.... 0000000000000000 
    t_peermaxseg.. 000005B4 snd_in_pipe... 00000000 
    sack_data.....@0000000000000000         snd_recover... 00000000 
    snd_high...... 00000000 snd_ecn_max... 00000000 snd_ecn_clear. 00000000 
    t_splice_with.@0000000000000000         t_splice_flags 00000000 


-------- TCB --------- INPCB  INFO ----(@ F1000E0000180AA0)----
    next........@0000000000000000  prev........@0000000000000000  
    head........@00000000061DDC00  faddr_6.....@F1000E0000180AC0  
    iflowinfo... 00000000 fport....... 00000000 fatype...... 00000000 
    oflowinfo... 00000000 lport....... 00000536 latype...... 00000000 
    laddr_6.....@F1000E0000180AD8  socket......@F1000E0000180808  
    ppcb........@F1000E0000180BB8  route_6.....@F1000E0000180AF8  
    ifa.........@0000000000000000  flags....... 00000400 
    proto....... 00000000 tos......... 00000000 ttl......... 0000003C 
    rcvttl...... 00000000 rcvif.......@0000000000000000  
    options.....@0000000000000000  refcnt...... 00000000 
    lock........ 0000000000000000  rc_lock..... 0000000000000000 
    moptions....@0000000000000000  hash.next...@F1000A002C047D10  
    hash.prev...@F1000A002C047D10  timewait.nxt@0000000000000000  
    timewait.prv@0000000000000000  inp_v6opts  @0000000000000000  
    inp_pmtu....@0000000000000000  inp_fastlo..@0000000000000000  

---- SOCKET INFO ----(@ F1000E0000180808)----
    type........ 0001 (STREAM)
    opts........ 0002 (ACCEPTCONN)
    linger...... 0000 state....... FFFF8080 (PRIV)
    pcb.....@F1000E0000180AA0  proto...@00000000061B5688  
    lock....@F1000E0000166A80  head....@0000000000000000  
    q0......@0000000000000000  q.......@0000000000000000  
    q0len....... 0000 qlen........ 0000 qlimit...... 0005 
    timeo....... 0000 error....... 0000 special..... 0E08 
    pgid.... 0000000000000000  oobmark. 0000000000000000 

snd:cc...... 0000000000000000  hiwat... 0000000000004000 
    mbcnt... 0000000000000000  mbmax... 0000000000010000 
    lowat... 0000000000001000  mb......@0000000000000000  
    sel.....@0000000000000000  events...... 0000 
    iodone.. 00000000          ioargs..@0000000000000000  
    lastpkt.@0000000000000000  wakeone. FFFFFFFFFFFFFFFF 
    timer...@0000000000000000  timeo... 00000000 
    flags....... 0000 ()
    wakeup.. 00000000          wakearg.@0000000000000000  
    lockwtg. FFFFFFFFFFFFFFFF 

MBUF LIST

rcv:cc...... 0000000000000000  hiwat... 0000000000004000 
    mbcnt... 0000000000000000  mbmax... 0000000000010000 
    lowat... 0000000000000001  mb......@0000000000000000  
    sel.....@0000000000000000  events...... 0000 
    iodone.. 00000000          ioargs..@0000000000000000  
    lastpkt.@0000000000000000  wakeone. FFFFFFFFFFFFFFFF 
    timer...@0000000000000000  timeo... 00000000 
    flags....... 0000 ()
    wakeup.. 00000000          wakearg.@0000000000000000  
    lockwtg. FFFFFFFFFFFFFFFF  

MBUF LIST

    tpcb....@0000000000000000  fdev_ch.@0000000000000000  
    sec_info@0000000000000000  qos.....@0000000000000000  
    gidlist.@0000000000000000  private.@0000000000000000  
    uid..... 00000000 bufsize. 00000000 threadcnt00000000 
    nextfree@0000000000000000  
    siguid.. 00000000 sigeuid. 00000000 sigpriv. 00000000 
    sndtime. 0000000000000000  sec  0000000000000000  usec 
    rcvtime. 0000000000000000  sec  0000000000000000  usec 
    saioq...@0000000000000000  saioqhd.@0000000000000000  
    accept.. 00000000008F001F  frcatime 00000000 
    isnoflgs 00000000 ()
    rcvlen.. 0000000000000000  frcaback@0000000000000000  
    frcassoc@0000000000000000  frcabckt 0000000000000000 
    iodone.. 00000000          iodonefl 00000000 ()
    ioarg...@0000000000000000  refcnt.. 0000000000000001 
    trclev........... 0001 

proc/fd:  49/3
proc/fd: fd: 3
              SLOT NAME     STATE      PID    PPID          ADSPACE  CL #THS

pvproc+00C400   49*writesrv ACTIVE 03100AA 02E0078 000000081C327400   0 0001


(0)>

Where:

writesrv is the process itself;
ACTIVE is the state (of course);

And, the MOST IMPORTANT ONE:

03100AA, that is the PID in Hex.

If you stills on KDB, you can convert it using kdb function hcal, like this:

(0)> hcal 03100AA
Value hexa: 003100AA          Value decimal: 3211434

(0)> 

Or, You can also use perl to convert it to decimal:

# perl -le 'print hex("03100AA");'
3211434

Tell me if you have a smart way to find the process and pid using a different way, i want to know, and of course, love to share it! Joao Bosco Cortez Filho

Script to show Total, Free and Used Memory on AIX

Just Copy and Paste:

(memory=`prtconf -m | awk 'BEGIN {FS=" "} {print $3/1024}'`
usedmem=`svmon -G | grep memory | awk 'BEGIN {FS=" "} {print $3/256/1024}'`
freemem=`echo $memory-$usedmem | bc -l`
clear
echo
echo "Memory Results:"
echo "----------------------"
echo
echo "Avai Mem: $memory GB"
echo "Free Mem: $freemem GB"
echo "Used Mem: $usedmem GB"
echo
echo)

Result:

Memory Results:
----------------------

Avai Mem: 2 GB
Free Mem: 0.69649 GB
Used Mem: 1.30351 GB

Have something different to Share? Let me know!! Joao Bosco Cortez Filho